INDOOR GOLF SIMULATOR

iPhone AI motion capture · AirPlay to Apple TV · Garmin R10 launch monitor

Two builds · one page · pick a version
Recommended Package - KERR-Verified

The Garmin Approach R10 SIG10 Package

Direct-from-vendor turnkey build at $3,599.99. R10 launch monitor + SIG10 enclosure + SIGPRO Premium impact screen + side barrier netting + foam padding + landing pad turf + your choice of hitting mat - bundled with free shipping in the lower 48, ships in 3-5 business days, 30-day hassle-free returns. This is the kit I'd buy today. Skips the parts-piecing I did in V1 and gets you to V2's polish faster.

View the Package ->

Affiliate link - Errol earns a small commission if you buy through it. No extra cost to you. Compared against Indoor Golf Outlet, Rain or Shine Golf, Carl's Place, and SimShack - Shop Indoor Golf's R10 SIG10 wins on bundled components + free shipping + clearest return policy.

GARAGE GOLF SIM - V1

Net Return enclosure + Garmin R10 + tripod projector - Dec 2022
4Build Phases 24Photos 1 dayBuild Window ~$1.8KAll-in Dec 2022First swing
STARTER SIM - MAT-ON-FLOOR EDITION
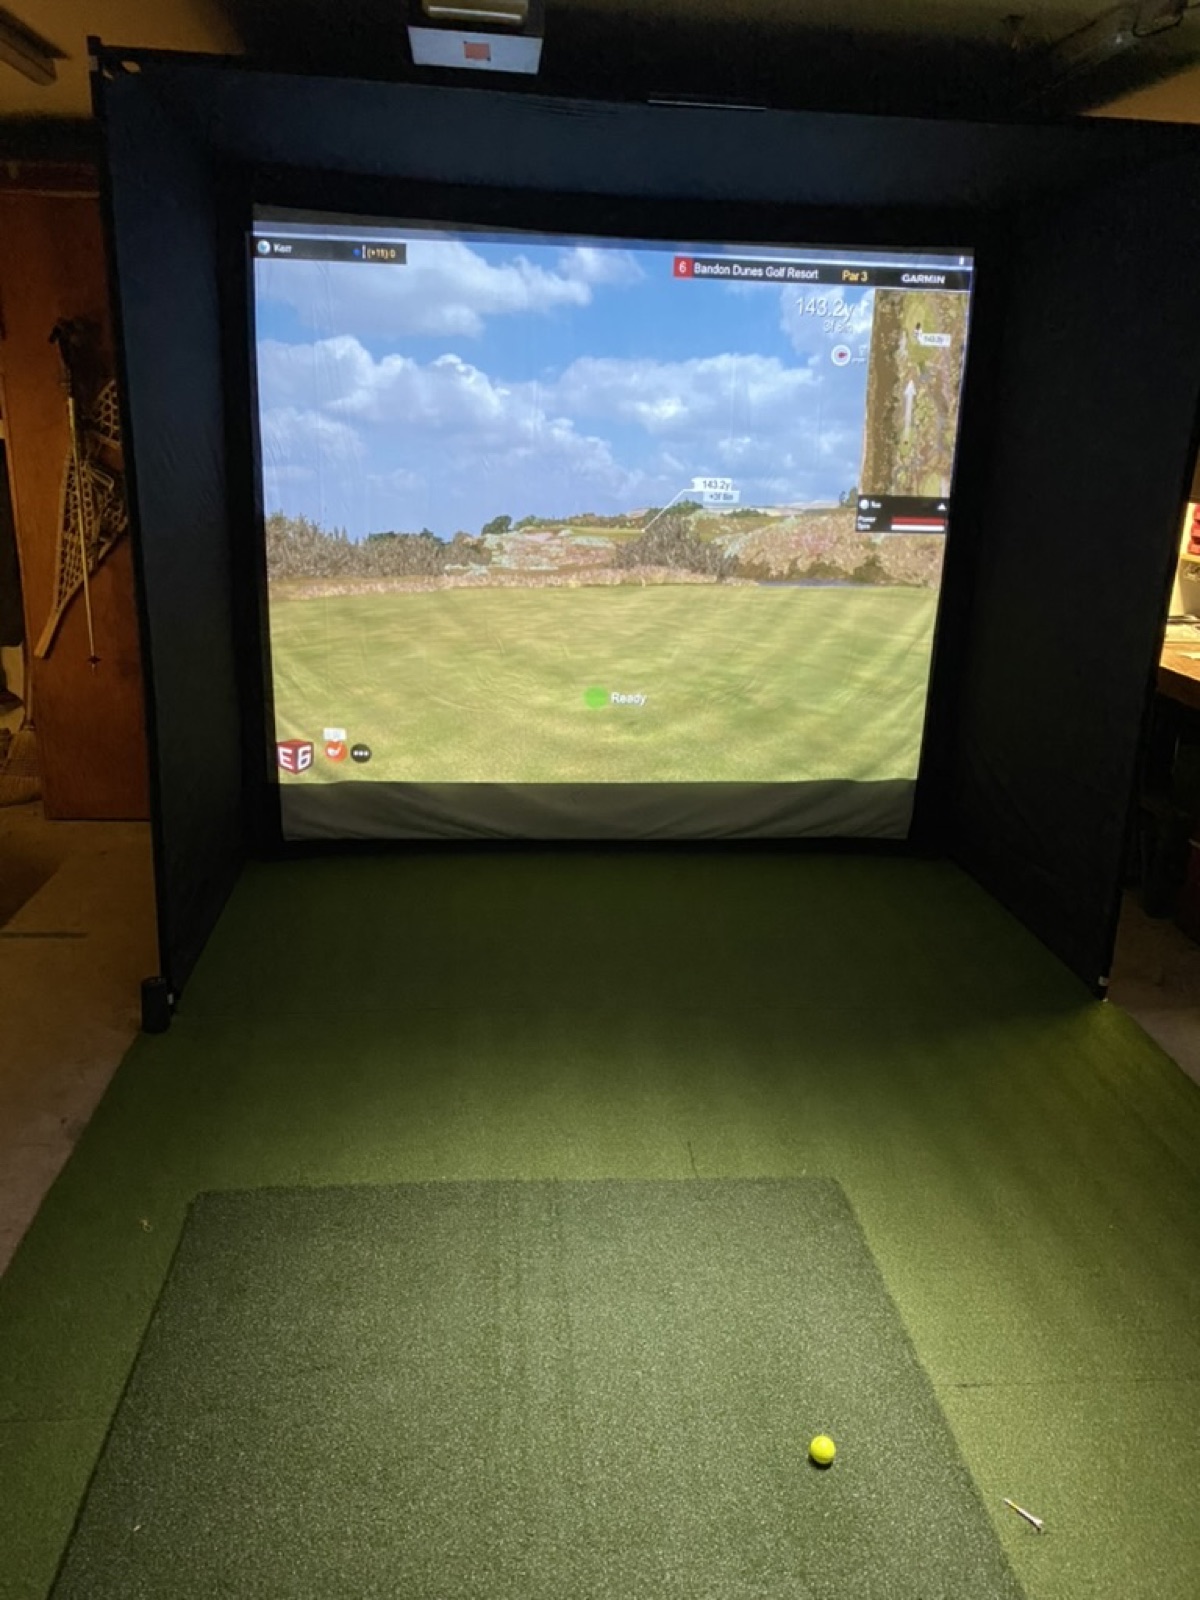
V1 garage golf simulator on Dec 13 2022 - black-walled Net Return enclosure framing a wall impact screen rendering the Bandon Dunes Par 3 hole with Garmin R10 tracking, putting green mat on the garage floor with hitting strip and tee box visible

What V1 Is

A real garage simulator built in a single afternoon for under $2K - enough to play 18 holes against your friends without leaving the garage.

V1 is the proof-of-concept. Set up in one afternoon (Dec 10, 2022), playable the same evening. A Net Return-style enclosure (10' wide, black framed walls, impact screen panel across the back) sits on top of a putting green runner mat laid across the garage floor. Hitting strip in the middle. Tee box marked at one end. Projector on a tripod throws Garmin's home simulator software onto the impact screen. Garmin Approach R10 launch monitor tracks every shot.

This is the $1.8K version - pre-assembled enclosure kit, off-the-shelf BenQ short-throw projector, the R10 (which was $499 at the time), an HDMI cable run, and the mat. No permanent installation. Nothing bolted to the wall. The whole thing breaks down in 30 minutes if a car needs the bay back.

What it does well: actually plays. Garmin's app renders real courses (Bandon Dunes, St Andrews, Whistling Straits - see the Bandon Dunes Par 3 in the hero shot). Ball flight + spin + carry distance are accurate to within a few yards on full swings. Stats screen gives you club speed + ball speed + smash factor + carry distance + spin rate every shot. Good enough to genuinely practice.

What it doesn't: short-throw projection bleeds light around the screen edges. The mat slides if you don't tape it down. Projector tripod gets bumped. The whole thing felt 80% pro and 20% temporary - which is why V2 happened 15 months later. Scroll to the V2 tab if you want to see what "permanent" looks like.

The Build - V1

Single-day timeline, Dec 10 2022. EXIF-ordered.

Phase 1 - Assembly Day - Dec 10 morning to afternoon

Out of the box, onto the garage floor

Enclosure kit arrives, gets unboxed, frame assembled, impact screen tensioned across the back. Putting mat unrolled. Tripod up. Cable run. By 4 PM the bay is a simulator.

Dec 10 2022 morning - garage prep before V1 simulator assembly
11:48 - garage prep, bay cleared
Dec 10 2022 - enclosure frame assembly mid-day
13:10 - frame going up
Dec 10 2022 - enclosure frame second angle
structure squared
Dec 10 2022 - early enclosure progress
13:41 - panels mounted
Dec 10 2022 - impact screen tensioning
15:31 - impact screen up
Dec 10 2022 - mat layout before play
16:18 - putting mat down
Dec 10 2022 - tripod projector positioning
16:51 - tripod + projector
Dec 10 2022 - simulator software calibration
17:29 - software calibration
Dec 10 2022 - R10 ready, first frames on screen
18:25 - R10 paired, ready
Phase 2 - First Play - Dec 10 evening

Built it. Played it. Same day.

From "still in boxes" at 11:48 AM to "playing Bandon Dunes" at 8:25 PM. The same-day-first-round test was the whole point.

Dec 10 2022 evening - first swings on V1 simulator
20:25 - first hit
Dec 10 2022 evening - stats screen after first swings
stats coming in
Dec 10 2022 night - first full round on V1
21:16 - first round in the bag
Phase 3 - Practice Sessions - Dec 12-13

Real reps - Bandon Dunes on a Sierra winter night

Two more sessions inside the first week. The simulator stays in the bay between sessions, projector on its tripod, mat rolled out - 5 minutes from "garage" to "tee box."

Dec 12 2022 - V1 practice session
Dec 12 - 20:01
Dec 12 2022 - V1 practice session stats
stats running
Dec 12 2022 - V1 simulator gameplay
20:35 - mid-session
Dec 12 2022 - V1 swing analysis
swing review
Dec 13 2022 - second-week practice
Dec 13 - 21:39
Dec 13 2022 - V1 session swing
tee shot
Dec 13 2022 - V1 practice continued
ball flight on screen
Dec 13 2022 - V1 finished Bandon Dunes Par 3
Bandon Dunes Par 3 - the cover shot
Dec 13 2022 - V1 late-night session
22:37 - late night
Phase 4 - Ongoing Use - Dec 23 + Jan 2023

Held up. Got played.

Two weeks later (Dec 23) and into the new year (Jan 6) - same setup, still in the bay, still played regularly. Proof that V1 wasn't a one-day novelty.

Dec 23 2022 - V1 holiday session
Dec 23 - 21:50
Jan 6 2023 - V1 new-year session
Jan 6 2023 - 21:41
Jan 6 2023 - V1 stats from new-year session
stats post-round

Parts - V1

Everything that got bought. ~$1,800 all-in.

Launch Monitor
Garmin Approach R10
$499 at the time. Tracks ball speed, club speed, smash factor, spin rate, carry distance, launch angle. Pairs to phone or tablet over Bluetooth, talks to the Garmin Golf app to render courses. Still the single best value in launch monitors today.
Enclosure
Net Return-style frame + impact screen - 10' wide
Aluminum frame + tensioned impact screen panel across the back. Pre-assembled kit ~$800. The whole enclosure breaks down in 30 minutes for car-bay reclaim.
Projector
BenQ short-throw 1080p - tripod mounted
Budget short-throw on a tripod ~$350. Renders the Garmin Home Tee Hero / Golf app screen onto the impact screen. Bumped occasionally - held up.
Floor
Putting green mat - runner
Runner-style synthetic putting green mat over the bare garage concrete. Hitting strip in the middle. ~$120. Tape it down.
Cables + extras
25' HDMI - power strip - alignment sticks
HDMI run from projector to a laptop or Apple TV running the Garmin app. Power strip for the projector. Alignment sticks to mark tee box. ~$30.

Full Photo Library - V1

All 24 photos from Dec 2022 - Jan 2023. EXIF-ordered.
V1 photo 01
V1 photo 02
V1 photo 03
V1 photo 04
V1 photo 05
V1 photo 06
V1 photo 07
V1 photo 08
V1 photo 09
V1 photo 10
V1 photo 11
V1 photo 12
V1 photo 13
V1 photo 14
V1 photo 15
V1 photo 16
V1 photo 17
V1 photo 18
V1 photo 19
V1 photo 20
V1 photo 21
V1 photo 22
V1 photo 23
V1 photo 24

BUILT-OUT ROOM - V2

Permanent ceiling projector + wall-anchored screen + full green carpet - Mar-May 2024

4Build Phases 42Photos ~10 weeksBuild Window ~$5.5KAll-in May 2024Reveal
DEDICATED ROOM - PERMANENT INSTALL
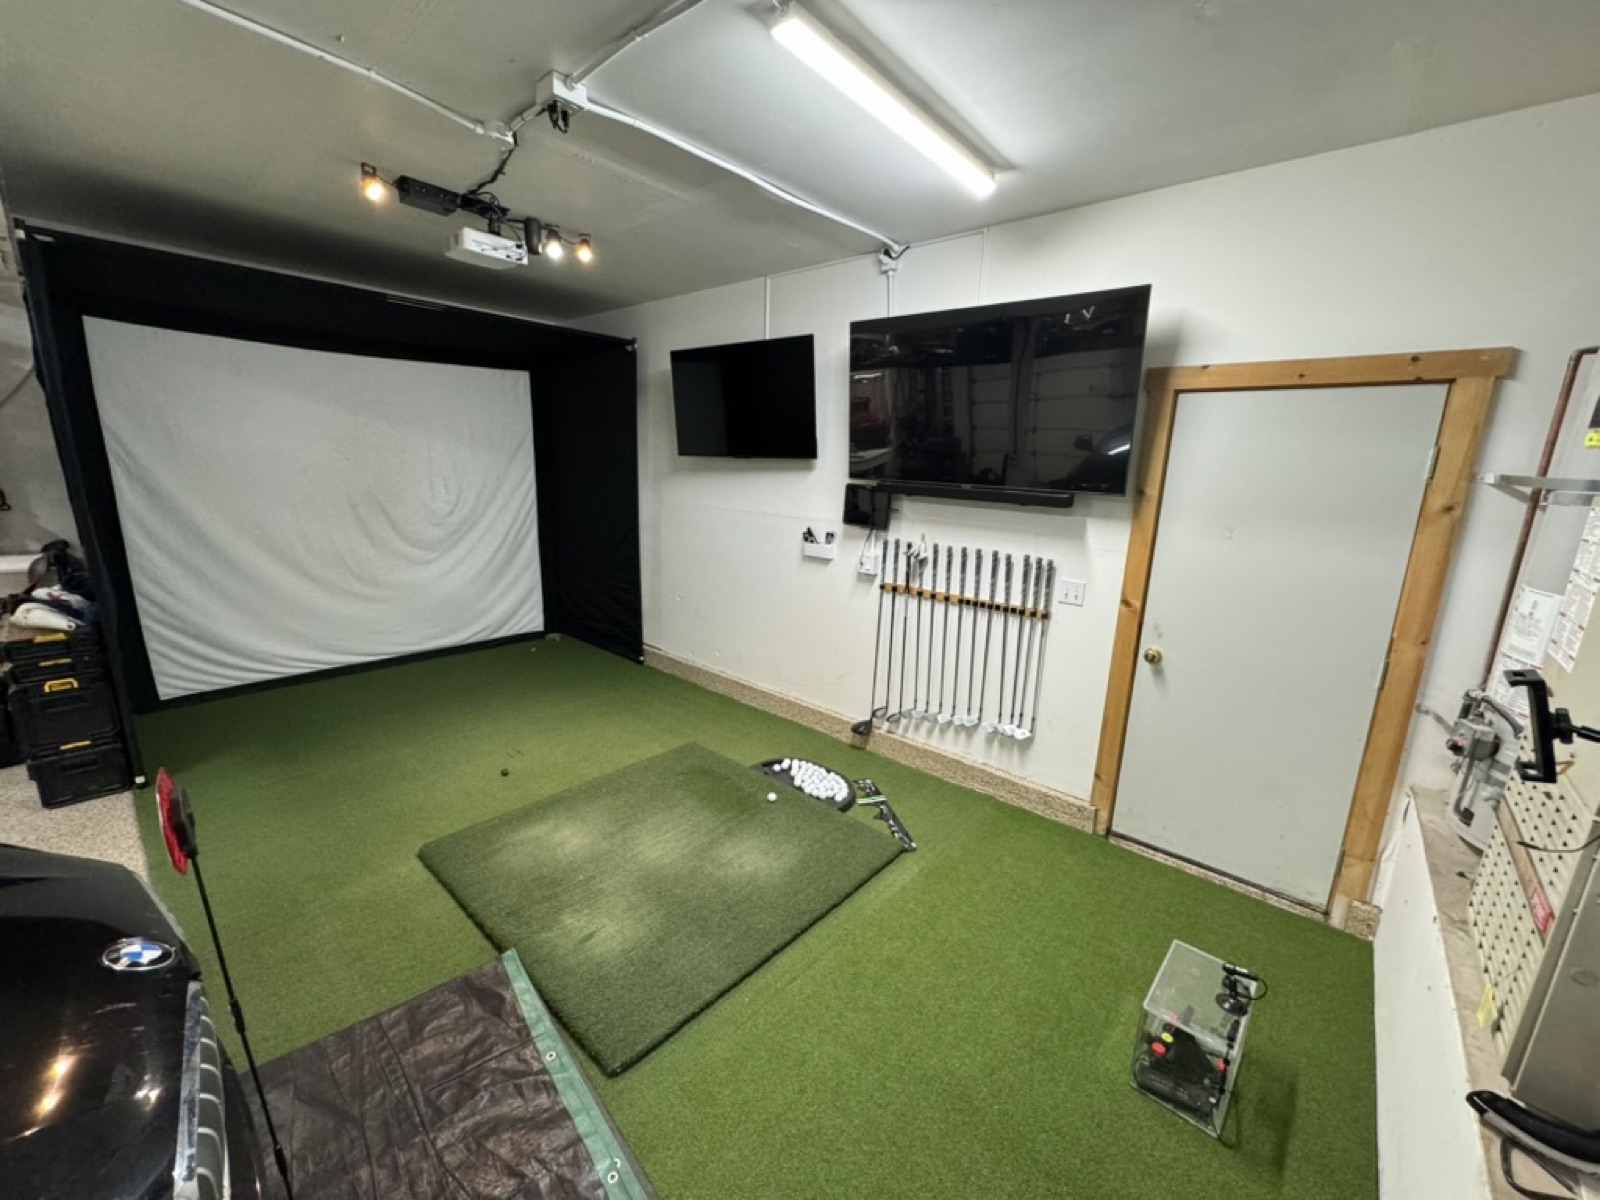
V2 garage golf simulator on May 26 2024 - built-out garage bay with permanent ceiling-mount short-throw projector under track lights, large wall-anchored impact screen, dual TV monitors mounted on side wall, wall-mounted club rack with full set, wall-to-wall green putting carpet, Garmin R10 on stand at the tee box, BMW SUV visible at left in same garage

What V2 Is

Same garage. Different bay. Permanent install. The simulator never has to come down again.

V2 took 15 months of saving "I'll build a real one." It happened over 10 weeks in spring 2024: demo + clear in early March, structural framing mid-March, screen + projector mount in April, finish + first play in May. By May 26 the simulator was permanently installed - and the bay it took over hasn't gone back to a car since.

The visual upgrade is real. Ceiling-mount short-throw projector on permanent rails replaces the tripod. Wall-anchored impact screen with frame replaces the freestanding enclosure. Wall-to-wall green putting carpet replaces the runner mat - the whole floor is green, every direction is in play. Track lighting overhead. Two TV monitors on the side wall for stats + course view at different angles. Wall-mounted club rack - full set hung, ready.

Garmin R10 carries over from V1 (it's still the right launch monitor at this price point). The same Garmin app renders the same courses - but now the playing surface, projection, and stats display are all permanent + polished. The whole experience went from "actually a simulator" to "actually a room you can play in." Friends come over and stay for 18.

Why V2 instead of upgrading components inside V1? V1 was inherently temporary - runner mat that slid, tripod that got bumped, enclosure that came down whenever a car needed the bay. V2 commits to the bay. If you're going to play more than once a week, V2 is the version that makes that easy.

The Build - V2

10-week timeline. EXIF-dated. Demo to first play.

Phase 1 - Demo + Clear - Mar 7 2024

Empty the bay. Frame what's going where.

V1 enclosure broken down, mat rolled up, bay swept. Planning sketches against the back wall. Decisions: where does the impact screen anchor, where does the projector hang, how wide is the playing zone.

Mar 7 2024 19:42 - bay clearout for V2 build
19:42 - empty bay
Mar 7 2024 - second angle of bay clearout
second angle
Mar 7 2024 - planning layout marks
layout planning
Mar 7 2024 - projector position dry-fit
projector dry-fit
Mar 7 2024 - final clear before build
decision made, build starts
Phase 2 - Frame + Structure - Mar 13-22

The bones go in

Two evenings on Mar 13, another on Mar 22. Impact screen frame anchored to wall + ceiling. Projector mount rails up. Track lighting wired. Bay starts to look like a room, not a garage corner.

Mar 13 2024 21:27 - frame structure going in
Mar 13 - 21:27 - frame in
Mar 13 2024 - frame second angle
second angle
Mar 13 2024 - projector mount rails installed
projector rails up
Mar 22 2024 21:49 - screen mount detail
Mar 22 - 21:49 - screen mount detail
Mar 22 2024 - side view of frame structure
structure view
Mar 22 2024 - framing complete
framing complete
Phase 3 - Screen + Projector + Carpet - Apr 6 to May 5

The room becomes a room

Impact screen tensioned into the frame. Projector mounted permanently on ceiling rails, focused and aligned. Green carpet rolled wall-to-wall - the floor goes from concrete to playing surface. Club rack installed.

Apr 6 2024 - impact screen tensioned into frame
Apr 6 - screen tensioned
May 5 2024 16:46 - finished walls + green carpet
May 5 - 16:46 - carpet down
May 5 2024 - second angle of finished room
room view
May 5 2024 - clubs hung, ready
clubs hung, ready
Phase 4 - First Play + Ongoing Use - May 26 and forward

The pro version of what V1 started

May 26 2024 - the cover shot. Everything in place. Track lighting on, projector firing, ball on the mat, R10 ready. From there: friends over, late-night solo sessions, snowy-day reps, post-work practice. The polished setup gets used way more than V1 did.

May 26 2024 - finished V2 room cover shot
May 26 - the cover shot
V2 ceiling projector close detail
ceiling projector
V2 wide angle of room in play
wide angle in play
V2 green carpet floor with lighting stand
carpet floor
V2 ceiling projector second angle
projector second angle
V2 player at tee box with stats display
tee box + stats
V2 second player at tee box wide view
wide player view
V2 player swinging with stats grid
swing + stats grid
V2 projector being mounted close-up
projector mount close
V2 Errol playing with stats overlay
Errol on the tee
V2 movie playing on the impact screen
movie mode
V2 Errol mid-swing in finished room
mid-swing
V2 movie on screen with golf gear in foreground
screen in second use
V2 projector unboxing reference
projector kit
V2 stats screen close detail
stats close
V2 Errol with practice balls scattered
practice balls
V2 putter practice with garage in background
putter session
V2 Errol in finished room with iPhone status bar visible
phone-screen capture
V2 swing session in finished room
finished-room swing
V2 player swinging at projection
player at projection
V2 Errol with balls scattered, stats above
all-balls layout
V2 close-up of stats display
stats display
V2 Errol playing with golf-ball arrangement
ball arrangement
V2 finished room with TV mount visible
TV mount detail
V2 putting green carpet with TV in corner
carpet + TV corner
V2 dim simulator setup with screen on
dim mood
V2 adjacent garage mech room - water heater + furnace
adjacent mech

Parts - V2

Everything that got bought above-and-beyond V1. R10 carried over.

Launch Monitor
Garmin Approach R10 (kept from V1)
Same unit. Still the centerpiece. Lives on a permanent stand at the tee box instead of getting set up + taken down each session.
Impact screen
Wall-anchored impact screen + welded frame
Tensioned impact screen panel locked into a welded frame anchored to the back wall + ceiling. No flex on impact. ~$900 for the kit.
Projector
Short-throw 1080p - permanent ceiling mount
Mounted on permanent rails to the ceiling joists. Focused once, never bumped. Aligned with the screen - no keystone distortion. ~$1,200 with mount.
Floor
Wall-to-wall green putting carpet + center hitting mat
Green commercial carpet rolled wall-to-wall + edge-tucked. Center hitting mat at the tee box. ~$650 for the carpet + ~$180 for the mat.
Stats display
Dual TV monitors - wall mount
Two TVs mounted on the side wall - one for the Garmin app course view, one for the live stats grid. ~$550 for both + mounts.
Lighting
Track lighting - 3-spot - ceiling rail
Track lighting overhead so the room is lit independently of the projector glow. Makes the room playable without the projector on. ~$180.
Club rack
Wall-mounted club rack
Holds the full set on the side wall. ~$120.
Cables + extras
In-wall HDMI run - power on the rails - stand for R10
HDMI run inside the wall to the projector mount + dedicated power. Custom plywood stand for the R10. ~$120 total.

Full Photo Library - V2

All 42 photos from the V2 build + ongoing use. EXIF-ordered where dates exist.

V2 photo 01
V2 photo 02
V2 photo 03
V2 photo 04
V2 photo 05
V2 photo 06
V2 photo 07
V2 photo 08
V2 photo 09
V2 photo 10
V2 photo 11
V2 photo 12
V2 photo 13
V2 photo 14
V2 photo 15
V2 photo 16
V2 photo 17
V2 photo 18
V2 photo 19
V2 photo 20
V2 photo 21
V2 photo 22
V2 photo 23
V2 photo 24
V2 photo 25
V2 photo 26
V2 photo 27
V2 photo 28
V2 photo 29
V2 photo 30
V2 photo 31
V2 photo 32
V2 photo 33
V2 photo 34
V2 photo 35
V2 photo 36
V2 photo 37
V2 photo 38
V2 photo 39
V2 photo 40
V2 photo 41
V2 photo 42